Photo Essay - Hot Raising a Norman Conical Helmet
The following series of pictures will illustrate the steps in raising a Norman conical helmet from a flat sheet of .074" mild steel. The tools used were a coke forge, two round faced hammers, an 8" diameter mushroom stake, and a special "T" stake made from pieces of railroad track. All of the shaping was done from the outside, there was no stretching from the inside of the blank.
|
|
|
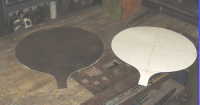
Step 1, the Starting Pattern
The blank is cut from .074" mild steel and the edges are deburred with a file. The shape is an ellipse that measures 19" by 18". The "handle" is what will become the nasal of the helmet. The corners near the nasal are left as the radius of a 4" circle. This will help prevent crack from starting here while compressing the metal. |
Step2 - Start of the First Pass
Instead of dishing the whole blank to start the shape, it is much easier to start by just raising the metal down. Instead of starting in the very center and working all the way to the edge as in traditional metalsmithing, the work is started from about 4" in, and then worked towards the edge. This will give the blank some "positive poise" and keep you from getting a giant potato chip shaped piece of metal. The piece is worked all the way around and out to the edge. The next pass will start about an inch closer to the center, and then worked out to the edge as well. The blank is worked this way until by the time you start a pass at the center, you pretty much have all the volume you need and you can begin refining the shape. The advantage to this method is that it seems to be faster and the center of the blank hardly gets thinned at all. |
|
|
|
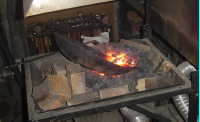
Heating the blank
I use a simple coke fired forge with different pieces of fire brick to prop the blank up to heat different areas. |
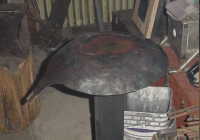
The Second Pass
This picture shows the results after the second pass. The piece is getting some depth and it is still staying pretty symmetric.
|
|
|
|
The Third Pass
The results of the third pass. The diameter of the blank decreases while the depth of the bowl increases as the metal is compressed down. Each pass takes about an hour and a half of hot sweaty work. |
The Fourth Pass
The piece is geting pretty deep. Occasionally I cool the blank down in the slack tub to keep from burning my hands.
|
|
|
|
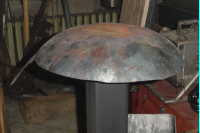
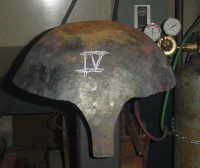
The Fourth Pass - Side View
This picture give a better idea of how deep the pice is getting. Notice the flat top. This is the area of the blank that hasn't been hammered yet. |